
Overview
OAuth2 which is the incremental version of OAuth has taken the Spring Security world by storm. Its vastness in the computer applications authentication sphere has already created a buzz in the developer community so much so that many frameworks including Spring Security are working day in and day out on implementing every aspect of OAuth2 as it comes. Through this article, we would be shedding some light on how to implement Spring Security with OAuth2 using an example of Single Sign-On (SSO).
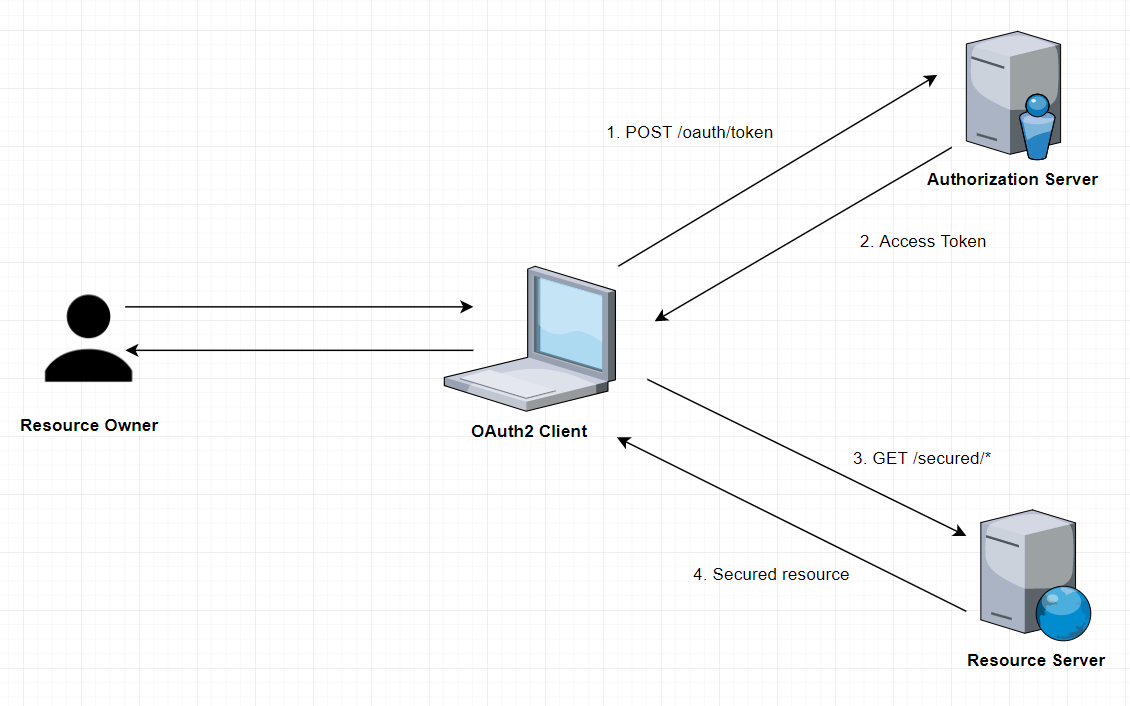
To achieve the same we will establish a very simple network, an Authentication Server and two Client Applications. The Authentication Server program will act as the centralized mechanism for the authentication procedures and the application would provide the functionality of Single-Sign-On.
In layman words, when a user attempts to gain access to a secured or restricted page or data through any of the two client applications, they will come across the authentication process first through the Authentication Server and then if it approves access, they can proceed to access the file or data. We will be using the Authorization Code grant type out of OAuth2 to drive the delegation of authentication.
With this let us jump in to know:
How to implement Spring Security with OAuth2
The Client App
We can use the Spring Boot Initialyzr or any other preferred way you like to start writing a Client Project. The only requirement would be to minimize the configuration process by using Spring Boot.
Maven Dependencies
Once you have a project, make sure you have the following dependencies:
| <dependency>
<groupId>org.springframework.boot</groupId> <artifactId>spring-boot-starter-web</artifactId> </dependency> <dependency> <groupId>org.springframework.boot</groupId> <artifactId>spring-boot-starter-security</artifactId> </dependency> <dependency> <groupId>org.springframework.security.oauth.boot</groupId> <artifactId>spring-security-oauth2-autoconfigure</artifactId> <version>2.0.1.RELEASE</version> </dependency> <dependency> <groupId>org.springframework.boot</groupId> <artifactId>spring-boot-starter-thymeleaf</artifactId> </dependency> <dependency> <groupId>org.thymeleaf.extras</groupId> <artifactId>thymeleaf-extras-springsecurity4</artifactId> </dependency> |
Security Configuration
Now, the most crucial part comes in. The configuration of Spring Security to implement SSO
Perm.xml
| @Configuration
@EnableOAuth2Sso public class FEUISecConf extends WebSecurityConfigurerAdapter {
@Override public void configure(HttpSecurity http) throws Exception { http.antMatcher(“/**”) .authorizeRequests() .antMatchers(“/”, “/login**”) .permitAll() .anyRequest() .authenticated(); } } |
Focus on the @EnableOAuth2Sso annotation as it acts as the core part of this configuration. This annotation enables us to implement Single Sign-On.
Also, remember that it is of utmost necessity to extend the WebSecurityConfigurerAdapter class as its absence would cost us the issue through which users would be redirected to the credentials page to login to get access to any and every page as all paths are secured by default. Finally, we have also defined classes and functions to define the scope of every request.
client.yml:
| server:
port: 8082 servlet: context-path: /ui session: cookie: name: UISESSION security: basic: enabled: false oauth2: client: clientId: SampleClientId clientSecret: secret accessTokenUri: userAuthorizationUri: resource: userInfoUri: spring: thymeleaf: cache: false |
Just to clarify a few points, we have disabled the default Basic Authentication, accessTokenIUri is the URI to obtain the Access Tokens, userAuthorizationUri is the authorization URI that users will be redirected to.
Front End
This part is not that important per se, but the interface for clients to appear to the users will be decided here. So, here is the front-end stack of the client application. Our client application here has a very simple front-end; here’s the index.html:
| <h1>Spring Security SSO</h1>
<a href=”securedPage”>Login</a> |
And the secPage.html:
| <h1>SecPage</h1>
Welcome, <span th:text=”${#authentication.name}”>Name</span> |
The secPage.html page is a secured/restricted page and needs users to authenticate before providing access. And hence, if they are not authenticated, they will be redirected to the home page where they need to enter the credentials.
The Auth Server
Now let us discuss our Authorization Server here.
Maven Dependencies
Once you have a project, make sure you have the following dependencies:
Perm.xml
| <dependency>
<groupId>org.springframework.boot</groupId> <artifactId>spring-boot-starter-web</artifactId> </dependency> <dependency> <groupId>org.springframework.security.oauth</groupId> <artifactId>spring-security-oauth2</artifactId> <version>2.3.3.RELEASE</version> </dependency> |
OAuth Configuration
Here is where the real work happens, here is where we will be building a mechanism for the authentication process. The Authentication Server starts loading in sync with the Resource Server, much like a single inseparable deployable unit. Let’s start with the configuration of our Resource Server – which doubles as our primary Boot application:
| @SpringBootApplication
@EnableResourceServer public class AuthorizationServerApplication extends SpringBootServletInitializer { public static void main(String[] args) { SpringApplication.run(AuthorizationServerApplication.class, args); } } |
Then, we shall configure our Authorization server:
| @Configuration
@EnableAuthorizationServer public class AuthServerConfig extends AuthorizationServerConfigurerAdapter {
@Autowired private BCryptPasswordEncoder passwordEncoder;
@Override public void configure( AuthorizationServerSecurityConfigurer oauthServer) throws Exception { oauthServer.tokenKeyAccess(“permitAll()”) .checkTokenAccess(“isAuthenticated()”); }
@Override public void configure(ClientDetailsServiceConfigurer clients) throws Exception { clients.inMemory() .withClient(“SampleClientId”) .secret(passwordEncoder.encode(“secret”)) .authorizedGrantTypes(“authorization_code”) .scopes(“user_info”) .autoApprove(true) .redirectUris(“http://localhost:8082/ui/login”,”http://localhost:8083/ui2/login”); } |
An interesting point to be noted here would be how the authorization code grant type is merely an enabler for any simple client.
Security Configuration
First, we will disable the default Basic Authentication, via our application.properties:
| server.port=8081
server.servlet.context-path=/auth |
Now we finally end up at the configuration which states how, why and for which data, files or pages of the application authentication is to be performed.
| @Configuration
@Order(1) public class SecurityConfig extends WebSecurityConfigurerAdapter {
@Override protected void configure(HttpSecurity http) throws Exception { http.requestMatchers() .antMatchers(“/login”, “/oauth/authorize”) .and() .authorizeRequests() .anyRequest().authenticated() .and() .formLogin().permitAll(); }
@Override protected void configure(AuthenticationManagerBuilder auth) throws Exception { auth.inMemoryAuthentication() .withUser(“Aayusi”) .password(passwordEncoder().encode(“1234”)) .roles(“USER”); }
@Bean public BCryptPasswordEncoder passwordEncoder(){ return new BCryptPasswordEncoder(); } } |
Though, for the sake of simplicity we used the in-memory authentication system, but the OAuth2 frameworks allows you to have user defined or custom userDetailsService.
User Endpoint
Finally, we will create the user endpoint we used earlier in our configuration. A JSON representation of the data accessed will appear or returned.
| @RestController
public class UC { @GetMapping(“/user/me”) public Principal user(Principal principal) { return principal; } } |
This article was all about how to get started with OAuth2 with Spring Security. Now you can easily develop OAuth authentication services along with Spring Security. This aims at an informative, practical and an easy take on creating an authentication service. You should learn about transferring file between Cloud – MultCloud.
Sources:
Author Bio:
Johnny Morgan Technical writer with a keen interest in new technology and innovation areas. He focuses on web architecture, web technologies, Java/J2EE, open source, WebRTC, big data and CRM.He is also associated with Aegis Infoways which offers Java Development Services.